Nail Trimming

Why do nail trimming and training at home?

Many clients are scared of trimming their dog’s nails, but it’s worth putting in the effort to learn how to do it yourself, and train your dog to allow it without fussing.

  • You can keep up with trimming more frequently, which is important for nail and foot health. Nails that are too long will push your dog’s toes upwards from the floor, which can cause pain and decrease stability. They are also more likely to get caught on something and get split, broken, or ripped off, requiring a vet visit.

  • Long nails can scratch painfully if a dog jumps on you.

  • You can do just one paw - or even just one nail - at a time to keep the experience short and sweet, which helps with training success.

  • You can save money by doing trimming at home.

  • If your dog is uncomfortable with nail trims, outsourcing the task to your vet or groomer will set them up to be the “bad guy.” It’s so much safer and easier on both your dog and the professional working with them to have a relaxed, cooperative experience.

    • Being forced to suffer through a nail trim in the name of “getting the job done” can be traumatic and make future nail trims more and more difficult and dangerous.


The anatomy of dog nails

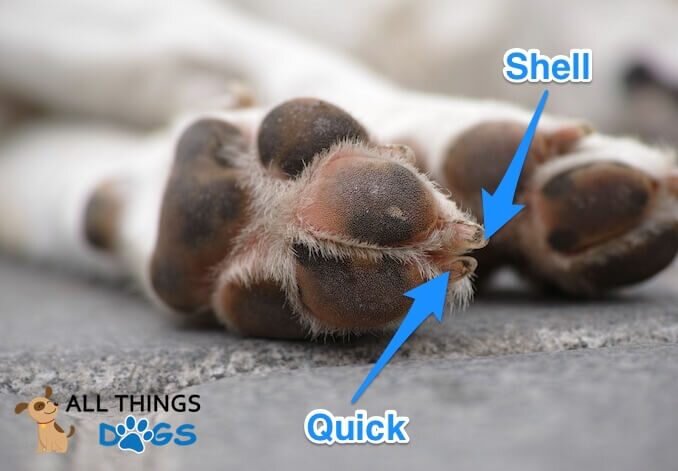
Before you start, you need to understand the shape and anatomy of your dogs’ nails. The outside cuticle is the part you’ll be cutting back. On the inside is a blood vessel (called the quick) and nerve. You want to avoid cutting into the quick because it will be painful and bleed a surprising amount.

Image from https://standardpoodleowner.com/poodle-grooming/anatomy-dog-nails/

Image from https://standardpoodleowner.com/poodle-grooming/anatomy-dog-nails/

Image from https://www.allthingsdogs.com/dog-anatomy/

Image from https://www.allthingsdogs.com/dog-anatomy/

There are a few ways to know that you are getting close to the quick. With white nails (as above), you’ll be able to see the pink blood supply, especially from underneath. With black nails, you’ll still be able to see the difference in texture between the hard outer cuticle and the inner part of the nail from below. In addition, between the quick and the outer wall is a white, chalky layer, easily visible in dark nails. If you cut (or dremel) a little bit at a time, you’ll see this layer and know to stop. More pictures of black nails here.

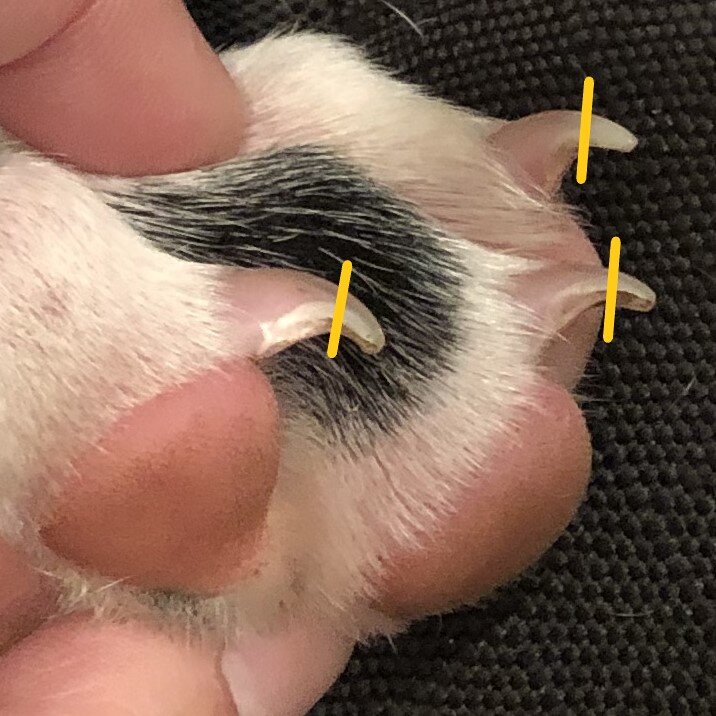
Puppy nails are particularly easy to trim. You’ll see the main part of the nail form a triangle shape, with a sharp point on the front. You can safely cut off that sharp point, and leave the triangle intact.

coffee cuenca 07b.jpg

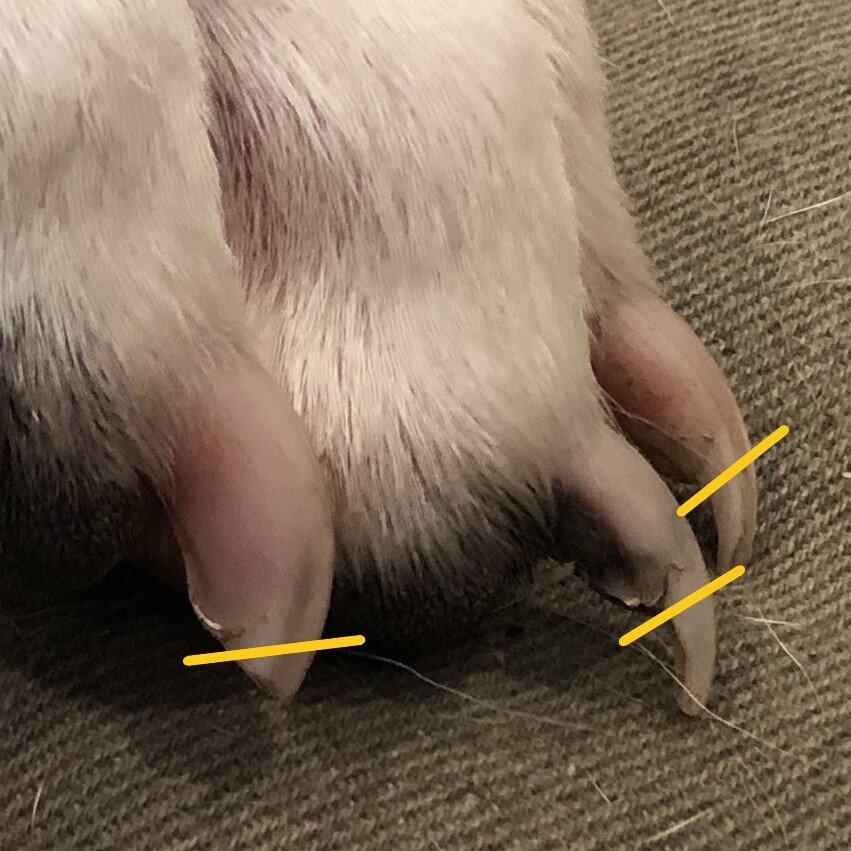
On older dogs whose nails were shorter and have recently grown out, you’ll see a similar change in shape with a little notch and a narrower front part of the nail.

calvin cuenca 01b.jpg
Image from https://gingercavalier.com/blog/how-to-cut-dogs-nails/

Image from https://gingercavalier.com/blog/how-to-cut-dogs-nails/


Here are three videos that provide good close ups of the trimming process, showing you where to cut and what to look for - this is helpful when using a dremel, too:


Tools and options for trimming nails

There are two kinds of clippers, known as scissor style and guillotine style. Personally, I do not like the guillotine style, as I find it harder to see what I’m doing. My favorite brand of scissor style clippers is from Safari (small and large sizes), and another popular brand is Miller Forge. Note that both of these brands, and many others, include a “guard” that supposedly keeps you from cutting too far and getting the quick. DO NOT use this, as it doesn’t account for individual variability in size and length of dog nails. Instead, use the information above and learn how to tell where each nail’s quick is.

Some people prefer to use a dremel, which is a rotary tool that can sand down your dog’s nails. Many people find that they can more easily see the quick coming and stop before they cut into it. Some dogs are more relaxed with the dremel, if they have previously been cut by clippers. However, many dogs find the noise of the tool to be scary, so you may have to teach them to be okay with it (see videos below).

If you really keep up with nail maintenance, you can use a file or buff to take a little off regularly and keep them very short and smooth (and way less painful when the dog jumps on you!).

20-07-02_scratchboard2.jpeg

A final option is teaching your dog to file his nails down all on his own! (See training videos below.) You’ll need to make or purchase a scratch board: a plank of wood covered with sandpaper. This is a great option for dogs that like training games, or who are particularly anxious about their nails being handled. The downside is that it’s much more difficult to train them to scratch on it with their back feet, compared to their front feet.

No matter what, you should always have styptic powder on hand during trims, in case you do cut into that quick. It promotes blood clotting and will stop your dog from dripping blood everywhere he walks. A common brand is Kwik Stop. Cornstarch can be used in a pinch. You can hold your dog’s bleeding nail in the container, or pinch some between your thumb and pointer finger and hold that tightly to the cut.


Video tutorials

If you have a puppy, start nail trim training right away! As shown above, it’s easy to see how far you should cut when they are young. If your pup is already trusting and good with handling, go ahead and get trims done while they are relaxed and sleepy.

If your pup doesn’t make it that easy for you, you’ll want to go through the process of desensitization and counter-conditioning to teach them to be comfortable with handling their paws and using your trimming tools. Here is an article all about D/CC. Make sure that you know the difference between just playing with your dog’s paws versus actually desensitizing your dog to handling:


Here is a helpful video on desensitizing your dog to paw handling, before you even bring out the trimming tools:


And one that starts with paw handling, and progresses through nail trimming:


*Note that you can combine traditional desensitization and counter-conditioning with the Bucket Game.


For extra ease of trimming, you can teach your dog to lie upside down between your legs, which gives you a great view of what you’re doing:


Here’s a desensitization tutorial for introducing the dremel:


And a few ways to introduce a scratch board and teaching your dog to file his own nails:

Print Friendly and PDF

Intro to Desensitization & Counter-Conditioning

Here are a number of resources that explain the processes of desensitization and counter-conditioning in training. These are among the most simple and effective techniques for changing behavior, especially when that behavior is motivated by underlying fear or anxiety. Please watch these first two videos:

The Basic Process of Desensitization & Counterconditioning For Your Dog | Dog Training

Counter Conditioning: a Visual Explanation


Here are the most important takeaways:

  • You must break your final goal down into small steps. For example, for dogs who don’t like getting into the car, you may work on first getting within a few feet of the car with all the doors closed, then approaching while the back door is open, then taking treats from the ledge where the door opens, then off the back seat, and so on.

  • At each step, your dog should be enjoying the training. If he is reacting negatively (such as running away, being wary of the treat, growling, or barking), that means that you need to go back to an earlier step.

  • Do not move on from your current step until you see that your dog has a happy response (such as wagging his tail, looking at you expectantly, or running to you every time he hears the trigger).

  • We are most likely going to be using lots of treats during this training - here are tips about choosing healthy, effective treats.

  • If you are properly breaking down the goal into small steps, you don’t need to worry that your dog will learn to bark or growl in order to get treats - he’s not rehearsing that behavior anyway, so he’s just learning that trigger = yay, treat!

  • It is critical that you avoid putting your dog into situations he can’t handle. For example, if he tries to bite every time he is picked up, avoid doing so. If he barks wildly every time he hears the doorbell, cover the bell and put a note on your door for people to call you when they arrive instead.

    • For those times that life happens, and your dog starts negatively reacting (barking, growling, lunging, etc), you should get him out of that situation as soon as possible. That might mean that you use treats to distract him. That’s okay, as long as it’s only happening a small percentage of the times that he is exposed to the trigger. The rest of the time, set him up for success with your training sessions.

  • Watch out for trigger stacking:

LR-triggerstacking.jpg
 

Here are videos that show specific examples of behavioral issues being resolved by the use of desensitization and counter-conditioning:

Print Friendly and PDF

Muzzles

Why a muzzle?

Muzzles often get a bad rap because they make a dog look “scary.” However they are an important tool for keeping dogs - and people - safe. There are multiple reasons that a dog may wear a muzzle, for example:

Cai wore a muzzle when he went to the emergency room for an eye injury.

Cai wore a muzzle when he went to the emergency room for a painful eye injury.

  • The dog is fearful of strangers or dogs approaching. The muzzle not only keeps this dog from being able to bite someone, it also acts as a signal for others to give him space.

  • The dog may be friendly and social most of the time, but bite in specific contexts, such as when guarding food or his owner.

  • The dog may be too rough with biting during play, but otherwise play nicely. (One of my own dogs fits this category.)

  • The dog may bite when in pain. (One of my dogs needs to be muzzled at the vet’s if he is injured because he would bite the vet.)

  • The dog may be in the habit of picking up trash or other unsafe items and trying to eat them.

  • The dog may have severe allergies or another medical condition that could be triggered by eating things off the ground, or eating another dog’s treats.

  • The dog may be required to wear a muzzle while traveling or due to breed-specific legislation.

Whatever the reason, muzzles can be a lifesaving tool.


What kind of muzzle should I use?

If your dog will be wearing the muzzle for more than a few minutes, you should use a “basket” muzzle. This is the type that creates a “cage” around the dog’s jaws. It mostly prevents the dog from biting anyone*, but still allows him to eat treats, drink water, and pant to cool himself down.

Do not use a “soft” or “grooming” muzzle that forces the dog’s mouth shut - this is dangerous because it does not allow the dog to pant to cool down. It may also still allow the dog to nip with his front teeth!

* Note that determined dogs may still manage to nip, bite, or grab objects through softer basket muzzles. Here is an article that compares muzzle types, and will help you choose an appropriate muzzle for your dog’s temperament and specific needs.

Here is a video from dog aggression expert Michael Shikashio on choosing an appropriate type and size of muzzle for your individual dog:


Where can I buy a muzzle?

Terra wears a muzzle because she can be too rough during play.

Terra wears a muzzle because she can be too rough during play.

There are a few brands that you can find in big box stores, however these may not fit your particular dog well, especially if your dog has a particularly flat, long, or wide snout (for example, French Bulldog, Greyhound, or pit bull-type). Always measure your dog’s snout rather than going by the “suggested size” for a particular breed. For example, the Baskerville Ultra is easy to find but has limited sizing options.

If your dog is full grown, I recommend purchasing a muzzle that is more accurately sized for your specific dog. That will require getting measurements of your dog’s snout, head, and neck. If you are ordering online, check the vendor’s recommendations for where and how to measure for their own products.


Wire muzzles - good for high bite risk dogs, with the one caveat that getting “punched” by a wire muzzle still hurts:

Vinyl muzzles - good for biters and scavengers:

Solid, non-flexible, injection-molded polyethylene (plastic) - good for biters and have an optional “scavenger guard”:

Custom biothane muzzles - for lower bite risk dogs; coverage can be fuller for scavengers or more open for increased airflow:


Teaching your dog to wear a muzzle

Now that you have your appropriately-sized muzzle, you need to teach your dog to be comfortable wearing it. Unfortunately most dogs will scratch and fuss if you just put something on their face and head out. Teaching them to be okay with it is not difficult, as long as you break the process down into little steps and make it fun along the way - that’s desensitization!

Here is a how-to video by Emily Larlham:

Here is another video by Chirag Patel:

Here is one from Sarah McManaman that focuses just on the process of buckling the muzzle behind the dog’s head:

 
Print Friendly and PDF

The Bucket Game

The Bucket Game is a way to teach a dog to be calm and hold still for handling. It allows him to give active consent, which prevents defensive or aggressive behavior; there is no need to growl or bite if the dog knows that he can politely ask you to stop at any time. This is a great way to desensitize a fearful dog to grooming or vet care, or prepare a puppy for future handling needs. (See full article on desensitization and counter-conditioning here.)


What is it, exactly?

This webpage gives a thorough written explanation as well as example videos. Please read/watch the entire page.

Note that you don’t need to have a literal small bucket - a bowl or cup is fine - as long as it’s not the same bowl that the dog normally eats from.


More example videos:

Chimera telling us he's ready for cold laser therapy via the Bucket Game.

Chimera telling us he's ready for cold laser therapy via the Bucket Game.

The Bucket game (English version) (Shows a dog already trained in the game receiving ear ointment)

Grooming with bucket game (Shows training for brushing from first steps)

Puppy Millie getting trimmed around her face

Puppy Coconuts getting used to paw handling

Puppy Coconuts getting used to brushing

Nail Grinding with the Bucket Game (Watch for what is described in the video’s info: “In the beginning of this video, I made a simple mistake that I didn't notice until I watched this. I started her out at the level that I had ended her last session at, instead of lowering my criteria and doing a warm up. She walked away right after to let me know and then notice how long it took for her to loosen up after because I had pushed way too far. The more you go their pace, the looser and more willing they are to play the game = more progress!”)


Written instructions:

  1. Place some treats into a small “bucket” or bowl. Start lowering the bowl toward the ground, 8-12 inches at a time. At each new height, if your dog looks at the bowl but holds still and doesn’t try to help himself, click or say "yes," then hand him a treat from the bowl. Your dog does NOT need to be sitting - standing or lying down is fine. If he tries to go toward the bowl, lift it away, wait for him to hold still, then try again. Repeat until you can place the bowl on the ground and he stays about 1 foot away.

  2. Give a few treats (with a pause between each treat) as your dog continues to look and hold still rather than going for the bowl. If he tries to help himself, lift the bowl away, wait for him to settle, then try again.

  3. Reach toward your dog’s side or back. If he continues to look at the bowl and hold still, click or say "yes," then give him a treat from the bowl. If he looks at you or your hand, pause, wait for him to settle, and retry.

  4. Repeat as above, but with a short pet on your dog’s side, back, or head/neck.

  5. Give longer pets in easy areas (usually back, shoulder, or head/neck), continuing to reward for holding still and resetting if he says “no thanks.”

  6. Practice handling various areas of your dog’s body, using grooming/vet tools as needed. Always let your dog tell you when he’s ready, when he needs a moment, or when he wants a break. Your dog is free to walk away at any time (and if he does, that means that you need to reevaluate your training steps.)

 
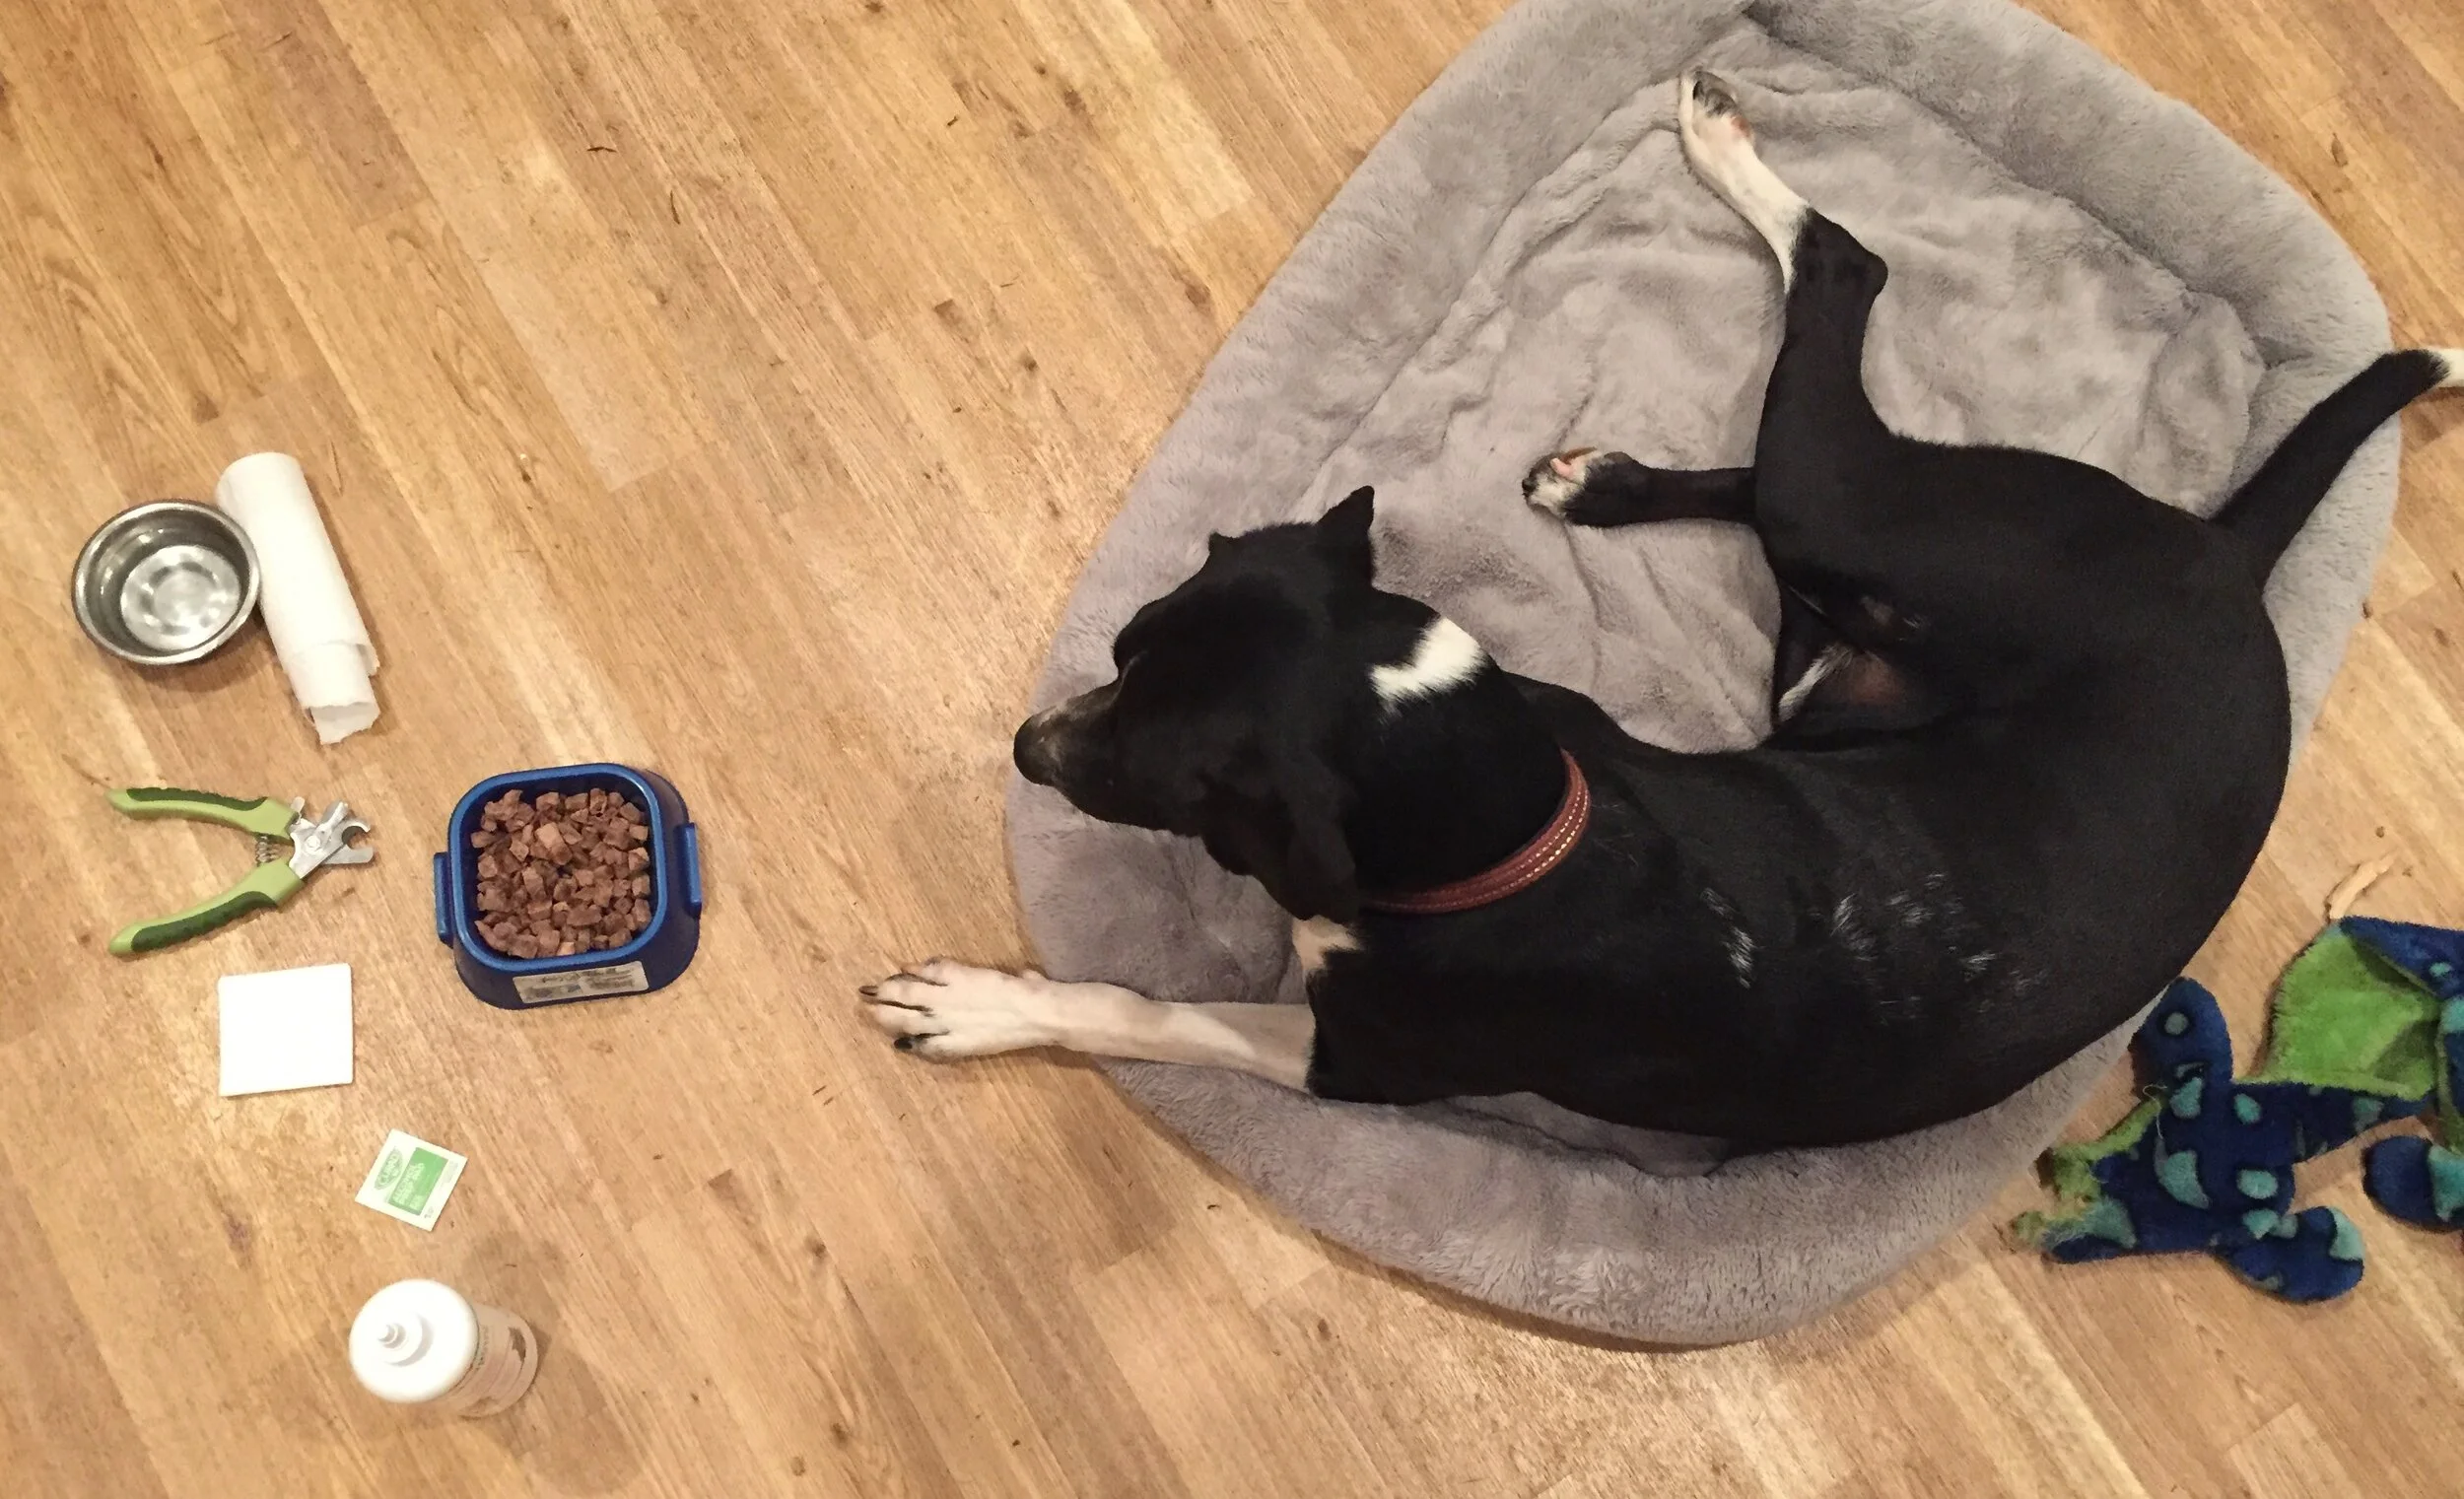
Geyser looks at the “bucket,” with some grooming and vet tools at the ready.

Geyser looks at the “bucket,” with some grooming and vet tools at the ready.

 
Print Friendly and PDF